Layers and train-more
A reading: what should we train after those defenses
The question underneath most gear and training arguments is: which layers in these fights did work worth copying, and which only look good because they never got hit?
By hand you would open every report in a slice, copy every troop line (type, tier, survived, killed, wounded, killing, points given up), then roll that up. That is the job people invent a spreadsheet for and then discover the spreadsheet cannot do.
Focus
Any slice where the layers are the point: one march you care about, a player’s rallies of a type, a defense pile, a keep sequence. Name the band if you have one (Ranged T12–T14, Mounted T1–T4).
Defense pile, then “what should they train?” is a first-class path. Sit on a player’s defenses (or their main-only cut, or another defense cohort you already focused). Then ask which troops to train or build more of. The Analyst weighs kills those layers got against points those layers put at risk if wiped — on this incoming, not a tech-tree lecture and not a blend of the whole battlefield. Recipe: train more on a defense slice.
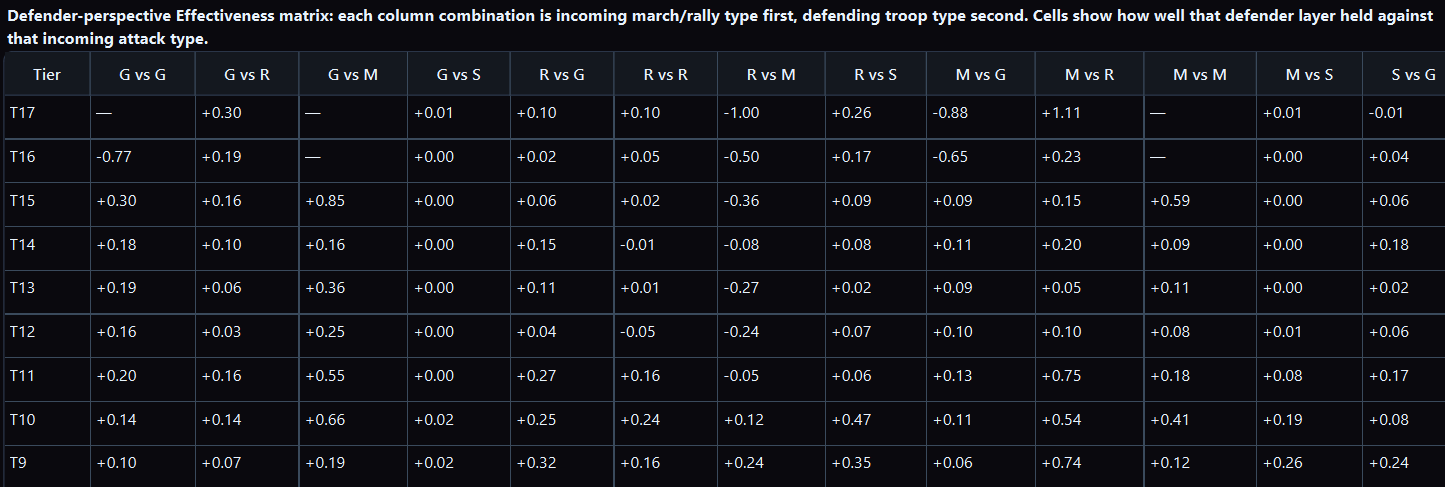
Why this used to be impossible by hand
A layer that got a lot of kills per troop can still be a terrible thing to train more of if wiping that band gives up a large amount of point risk. Scoreboard points scored do not show that. You need return versus what that band put at risk — Effectiveness — and you need it on the slice you mean, not “ranged in general.”
Questions (any wording)
What worked in the slice
- Which layers did the killing on these holds / these rallies?
- Which layers gave up the points?
- Which bands look good on Effectiveness, and which are just large?
Train-more / build (especially on defenses)
Once the current focus is defenses, you can ask in short form:
- What troops should they train?
- What should [this player] build more of?
- What should I train for this defense?
- Which layers returned the most, and what is the cost if those troops are wiped out, on these holds?
Those wordings are the same ask. The Analyst is weighing a tradeoff — a reading, not crowning a kill leaderboard. On one side: the kills those layers actually got in this pile. On the other: the points those layers put at risk — what you would give up if that band were wiped (higher tiers cost more points per troop). A layer that killed a lot can still be a poor thing to train more of if a wipe of it is expensive. A cheaper layer can be the better volume train even if it looks weaker on kills. Effectiveness is the usual way those two sides are netted; you should still be able to see both pieces.
If you are still on attacks, say whether you mean train-more on these attacks or switch to their defenses. Do not expect the Analyst to silently flip sides.
Longer wordings still work on any layer slice:
- If I use this as a guide for what to train more of, where is the upside versus the cost if those troops are wiped out?
- Why does a smaller march beat a larger one on Effectiveness here?
- Is a high Effectiveness on a tiny band a real stake, or a small sample dressed as a training plan?
Compare bands
- Ranged T12–T14 vs Mounted T1–T4 on this defense slice.
- Our top ground vs our ranged on these rallies.
- Were particular compositions disproportionately effective on this pile — and in which situation (incoming type, keep)?
Honesty
- Don’t average a night of different targets into a training plan.
- Don’t treat one lucky hold as a tech tree.
What a good answer looks like
Type × tier (or the band you named). Kills and points-at-risk both visible, not kills alone. A warning when the sample is three fights. No “therefore always train T14” from a single keep.
Common miss
Asking “what should I train?” on the whole battlefield with no role and no band. That is a blended number dressed as advice. Cut first. Pair with points vs Effectiveness.
Train-more is kills versus wipe-cost on a named slice — not a tech tree.
Opening screenshots do not roll type × tier across a defense pile. Fast Read the event, focus the holds you mean (player defenses, main-only, or another cohort), then ask which layers have upside without a ruinous downside on this incoming.
New customers can start with a 7-day trial. Plans start at $14.99/month with full feature access.